The hidden Superbosses of Look Outside (till v2.1)

Look Outside is an amazing comedy-horror JRPG entirely set inside an apartment building. However, in this place, tons of terrible things are hidden, from a parallel Meat World, to a glitch land existing inside a cursed videogame, and an entirely flooded apartment. With every new update, the world gets bigger and bigger, and, especially after the 2.0 Final Vision update, the game is almost in its final state.

Bosses and monsters also get expanded with each update, and now the Bestiary is simply huge. For example, according to the wiki page, there are at least 35 bosses in the game. And we are only talking about bosses, so the complete Bestiary is insanely huge. The main character and party members also get stronger, with new weapons and characters to recruit. And so do the bosses, with new and stronger bosses released at every update.

In the following article, I will focus on the superbosses hidden in Look Outside, enemies that are far stronger than the final boss of the game, often guarding powerful weapons or equipment. Some of them are really difficult not only to defeat, but also to unlock and reach. I will focus especially on completely optional bosses, guarding weapons, and not related to any ending… with maybe a couple of exceptions. Since Look Outside is always updated, including new superbosses in an update following the “Final Vision,” the article could be updated with future updates.

Hellcar

Hellcar is the first superboss encountered in the game since the first release. Hidden in a car park inside the basement, the Hellcar is a devilish orange car that will attack after the player collects the flamethrower. Hellcar has an insane amount of different phases, making it one of the longest battles. First, Hellcar attacks directly, using powerful burning attacks and its light to blind the characters. During the next phases, Hellcar will use its long tongue to swallow the player inside its body. At this point, the player has a limited number of turns to kill Hellcar before being literally dragged to hell, reaching a game over with a special bad ending. During the second phase, Hellcar’s interior is full of ghostly passengers, which of course must be killed. In the next phase, the element of the interior design transforms into demons and must be killed. During the last phase, the Hellmouth is revealed, a giant maw inflicting heavy damage. If you are fast enough in killing all the phases before going to hell, the reward is the powerful Hellblade, the strongest weapon in the first update.

Furnace

Furnace is the superboss of the original 1.0 release. The creature lies hidden in the sewers, the most challenging section of the basement. In the middle of a room flooded with water, a shut-down furnace is waiting to be awakened again. Before fighting the boss, the player must fight six giant ticks draining the heat away from the tubes. After killing the ticks, Furnace will come back to life. While even only accessing the fight is a chore, defeating Furnace is a real challenge. The boss looks like a hellish boiler room, with fire drawing a disturbing grin on the metal. Furnace uses powerful fire spells, causing the burning status with almost every attack. However, the biggest issue is its chargeable attack. Turn after turn, the fire grin becomes bigger, highlighting how the creature is almost ready for its most powerful attack. A firestorm will hit the entire party, with a high probability of one-shotting several characters. If not, the entire party. Surviving the annihilation is difficult, even by guarding the attacks, and killing Furnace before it unleashes hell is even more complicated due to the high HPs. In 1.0, Furnace had no reward for such a challenge. However, next updates introduced Furnace Edge, the only fire-based melee weapon.
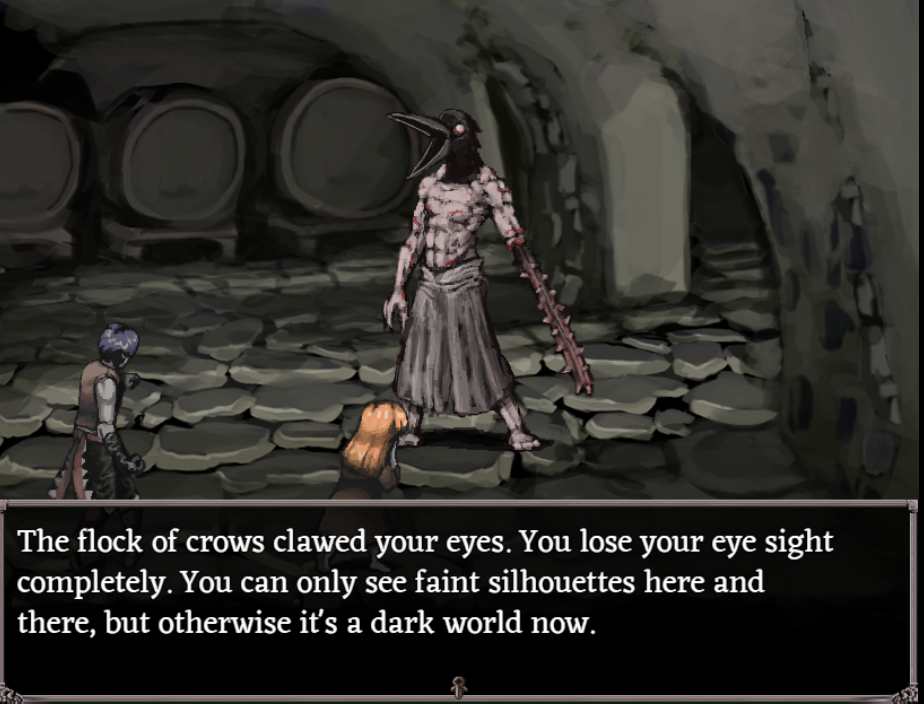
Taxidermy

Taxidermy is the owner of the disturbing apartment on the 3rd floor, a place full of stuffed animals and hosting a stitched-skin dimension. In the beginning, Taxidermy appears as an immobile humanoid statue, with a grotesque mask-like face and horns on top. After traversing the parallel dimension, the Taxidermy statue starts to move, becoming a challengeable boss battle. In 1.0, Taxidermy has two main phases, with the second one called Suture Wire. In this phase, the boss covers itself in deadly metal wires, and is able to use powerful bleeding and slashing multi-hit attacks. However, the boss was still an easy fight, regardless of the disturbing appearance. But everything changed with the 1.6 update, when Taxidermy got a challenging 3rd phase. After Suture Wire is defeated, the creature merges with the stuffed animals in the room, becoming a grotesque and disturbing abomination. The main head is that of a moose, which can open up, revealing an even more disturbing interior. A bear and rhino head complete the disturbing design, merged together on a fat rhino body. In battle, the creature is terrifying, becoming a 3-enemy fight where each head has unique attacks and HPs. While the rhino and the bear are the main physical attackers, the moose launches deadly magics, including a black hole able to annihilate the entire party. To defeat Taxidermy, all the heads must be slayed. And if the normal battle was not challenging enough, in Cursed mode, introduced with the 2.0 update, the Taxidermy 3rd phase became a 5-enemy battle, since the creature now also merges with a crocodile and a swordfish.

Drowning

Drowning is a very peculiar superboss hidden in the 2.0 update. A new apartment appears in the building, a place completely flooded and underwater. The party has a limited amount of time to spend underwater before drowning, maybe a reference to the original FF7, where facing the underwater Emerald Weapon was regulated by a timer. However, in Look Outside, when the timer reaches zero, there will not be an instant game over. Instead, a battle against Drowning will begin. In 2.0, Drowning looked like a disturbing deep water creature, with giant jaws full of teeth and details difficult to understand. However, its design changed in 2.01, appearing more like a bug-related creature. The fight is not especially difficult for the damage received, since Drowning doesn’t hit very strongly, but more for the insane amount of HPs. In fact, Drowning has almost double the HPs of the final boss or Furnace. To defeat Drowning, you must heavily rely on status effects such as bleed or poison to chip away the huge HP pool. The reward for killing Drowning? Well, since the main character defeated the concept of drowning itself, he will become immune to it, and will be able to explore the flooded flat without timing. Not the best reward for the long effort.

Wilhelmina

Wilhelmina is a powerful witch trapped in a hidden basement inside the building in version 2.0. The craziest thing? Wilhelmina is inside a crossword-related dungeon. To access Wilhelmina, the player must complete the entire crossword book in the main apartment, a long and time-consuming task. After that, a secret password grants access to a dungeon contained inside a safe. Wilhelmina is trapped in a coffin protected by powerful sentences, which must be broken in order to free her. At this point, freeing Wilhelmina causes a secret ending, while facing her unlocks a challenging battle. Wilhelmina uses powerful and unique spells, including making the entire party regurgitating frogs, or breaking all their bones, causing massive debilitations and continuous damage. Moreover, Wilhelmina can also inflict almost every possible status effect, from stun to bleeding. By defeating Wilhelmina, the player can choose a special weapon as a reward, choosing from a sword, spear, or hammer.

Sybil

Fighting the real Sybil is part of a long and challenging secondary quest introduced in the 2.0 update. First, you must collect an Iris Key during the blackout, to then start to explore the Meat World to collect other keys. Then, you must explore and solve the mysteries and puzzles of apartment 12 to finally have a chance to meet Sybil. However, it is only after bringing her the repaired telescope that you can decide between two paths. And only by pursuing the truth, you are able to attack her, revealing her real form inside the Meat World. The real Sybil is a grotesque and colorful mass of flesh, with eyes and teeth all around.  However, fighting her at this point leads to an impossible battle, since Sybil can also attack 8 more times in a turn. To limit this ability, you must traverse the Meat World to kill 9 Organs, grotesque bosses with special powers, providing unique attacks to Sybil. For each Organ killed, Sybil loses a special attack, including the ability to digest your max HPs. However, the Organs regenerate after in-game hours (32h on normal), so not only you have to destroy them, but even in a limited amount of time. Even with the Organs destroyed, Sybil is still a tough fight, especially for the high HPs. At the moment, defeating Sybil mainly unlocks a bad ending inside a hidden room, without a strong reward for such a massive effort.

Baby Teeth

The apartment where the Teeth Family was corrupted by mutating into grotesque masses of teeth is one of the most disturbing locations in Look Outside. Baby Teeth is the boss of the apartment, an infant that mutated into a colossal abomination, spreading teeth on whoever gets bitten. The boss can be easily defeated or avoided, and the creature will simply hide again under the floor. However, after the update 2.0, the apartment got sealed by a giant mouth. The fauxes opened again in 2.1, where the mutated apartment became explorable again. And hidden under the floor, after a dungeon of flesh and teeth, Baby Teeth is waiting for her rematch. Just this time, the battle will be far more difficult. Considering that the apartment opens again on day 9, almost at the end of the game, says all about the difficulty of the fight. Baby Teeth grotesquely mutate during the battle and can attack with multiple body parts, including two long tongue-tentacles. The infant is highly resistant to different types of damage, can cause bleeding, and has an insane berserk attack. Moreover, the dungeon itself is constantly chewing whoever is inside, and every turn, the walls attack everybody, both the entire party and Baby Teeth, creating an even more unconventional and difficult battle. After defeating Baby Teeth for the (hopefully) last time, the player can access two new tooth weapons, including a rifle that converts HPs into tooth bullets.

Swordmaster Comatus

Comatus is another superboss added in the update 2.1. The mushroom swordmaster hides behind a fake wall in the depths of the fungal colony. The boss is probably an homage to FromSoftware’s bosses, a loyal and powerful swordmaster that fairly challenges the player to a duel. Facing Comatus is quite easy, but defeating it is a far more difficult task. Comatus hits like a truck with multiple attacks, is highly resistant against physical damage, and can adopt different stances. For example, it can counterattack physical attacks or heal at the end of the turn. Defeating Comatus unlocks the Whisperblade, a really powerful sword.

Honko

Honko is the protagonist of a videogame that you can play in the flat to learn a new skill. And in 2.1, Honko appears as a superboss in the new Glitch World. Already accessing the Glitch World is a complicated task, since it is only possible after using the cursed videogame hidden behind a secret door on a console inside a parallel meat world. Moreover, the Glitch World is a challenging dungeon to traverse, full of monsters, peculiar status effects, and glitched items. And fighting Honko is even more obscure. First, you need to find and finish his videogame, and only then can you find a secret path behind a glitched tile. Honko is a tragic figure who doesn’t want to fight but is forced by glitches. During the fight, the cute pink humanoid continuously glitches, sometimes briefly appearing as a cursed version of himself, or even dead in a pool of blood. Honko is extremely powerful, immediately showing huge defense and agility, making it very difficult to hurt, healing powers activating every turn, and the ability to inflict multiple status effects with a single attack. And if this was not enough, after sufficient damage, Honko splits into three entities… and then into five! The main Honko now launches really powerful spells, while the others hit hard and inflict status effects. The reward for defeating Honko is many candies providing permanent upgrades.

Magical Girls Vs. Evangelion-like Angels: the 4 Sephirot of Blue Reflection [Boss Battle]

Blue Reflection is one of the rarest games of the last generation, and also a very peculiar JRPG. At first glance, the title looks like a generic school-setting JRPG focused on fan-service. And yes, the game has many scenes of the protagonists in “unusual” situations, but there is also far more to that. While it is true that Blue Reflection is entirely set inside the school, with just some quick missions inside a parallel dimension, the game also shows pretty unique quirks.

The main protagonists are modern magical girls, using their powers to face some really disturbing enemies: the Sephirot. While waiting for the Sephirot’s arrival, the party must explore dungeons inside the mind of schoolgirls heavily disturbed by a feeling, till going insane. And if you think now we are getting to darker territories, let me just focus on how Blue Reflection has big vibes from Puella Magica Madoka and Evangelion.

The references to Madoka are pretty obvious: magical girls fighting disturbing beings, with the truth getting each time creepier. The Sephirot are instead the connection with Evangelion, and the main reason behind this article. Mysterious and powerful beings, there are only 4 Sephirot, and each of them is attracted to the school. The heroines need only to wait enough time till a Sephira shows up. And then, a dramatic battle begins. Exactly like for the Angels of Evangelion.

The Sephirot have a dark and intriguing design, which really stands out from the general “school-life” setting of the game. Moreover, every battle against these beings is extremely choreographic, a long collections of insane action and gorgeous attacks. Seriously, the game completely changes during these battles (which you can see in a video at the end of this article). Each Sephira will attack the school twice, and only in the second and most difficult battle they can finally be destroyed.

So without further introduction, let’s have a look at the 4 Sephirot.

Yesod

The first Sephira is probably the most grotesque and disturbing, a colossal mutant composed of multiple bodies fused together. The lower body is the largest creature, a four-legged mutant with a big and grotesque face. Nested inside the lower body lies another face, the smaller body, surrounded by many arms frenetically moving around. The main body towers above, a muscular and thin mutant with long tentacles instead of fingers.

Yesod appears shooting deadly beams toward the school. The creature will get closer and closer during the battle. From afar, Yesod will target the party with strong beams and explosions. The multiple bodies of the creature are also potential targets and, once all the different heads are destroyed, the main body will get weaker. However, there is few time to celebrate, because Yesod will quickly reanimate them. When getting closer, Yesod can attack by creating shockwaves by hitting the ground, or using a dangerous bone blade coming out of its body.

Cochma

This Sephira looks like a cross between a Gothic cathedral and a tank. Cochma walks around like a tank, a bizarre vehicle harbinger of destruction. Its secondary cannons look like pinnacles of a modern church, thin and pointy, but not less destructive. The main body seems more like a creepy skeleton, with a huge round mouth, which of course works as the main cannon.

Cochma uses its dozens of cannons to attack the party. Some cannons shoot direct projectiles, while others throw grenades. Moreover, hundreds of machine-guns are hidden inside holes in its body, and they can shoot all-at-once for a storm of bullets. The main cannon is of course the most dangerous attack, a massive weapon able to cause insane damage. Cochma’s cannons are divided into two sets: Eas and Wes (East and West?). By destroying them, the party can temporarily disable the cannons.

Tephereth

If you were looking for a closer connection with the insane geometries of some Angels in Evangelion, such as Ramiel or Arael, Tephereth is the closest link. Appearing as what could be described as a flying jewel, the Sephira is a golden creature emitting energy. When it appears, the skies become of unnatural colours.

The creature is a strong opponent, with different body parts able to boost attack and defence. Tephereth mainly attacks by throwing storms of darts and energy bullets, so many that will cover the battlefield with explosions. Moreover, its body can reassemble, like a mechanical being. This includes morphing the main body into a sort of chainsaw, to then crash into the battlefield.

Netzach

The last of the Sephirot has a rather simple design. Netzach is a sort of mix between a knight in heavy armour and a Gundam. The crystallised armour protects the creature, while a spear and a shield work both as weapons and extra protection. The Sephira has some sort of wings, working like a propeller and allowing it to fly around. 

Without surprise, Netzach is the strongest Sephirot. Its weapons are both targets, called Drago, probably in honour to dragon-slayer knights. The shield can heavily buff its defence, while the spear can throw many attacks, including an energy beam. The Gundam-like appearance of the boss is also reflected in some attacks, including throwing arrays of missiles from the shoulders. The shield also works as a weapon, transforming into a circular saw. However, the most dangerous attack is when the spear becomes crystallised. The difficulty of this boss battle lies also in the ability of Netzach to inflict many negative statuses, including a deadly poison that will quickly bring a character to death.

In the following video on Surreal and Creepy Games, check all the battles against the Sephirot.

The many forms of the Slit-mouthed Woman in World of Horror

The Slit-mouthed Woman (or Kuchisake-onna) is probably one of the most famous Japanese urban legends. The creature is pretty old and part of the variegated supernatural Japan background as much as any other Yokai or Onryo. The most official source for the Slit-mouthed woman is a newspaper article in Gifu prefecture dated back in 1979. Then, more articles about the creature started to spread, almost causing panic across Japan. Other references connect the Slit-mouthed Woman with the victims of horrible crimes back in feudal Japan, making her a proper Yokai.

Regardless of her origin, the story and the appearance are pretty much the same. The Woman looks normal, the only peculiar element is a mask covering her mouth, often a surgical one. In Japan, face masks were always very common, long before the advent of COVID-19. However, there was probably a time back then when it was still not so common to see people around wearing it, thus creating this urban legend. After the mask is removed, the Slit-mouthed Woman will show her terrifying face, with a big and carved mouth, often depicted as full of pointed teeth. The creature always carries with her a blade, such as a knife or scissors, which she uses to kill or disfigure her victims. When encountering a victim, the Slit-mouthed Woman will ask if she is pretty. If the victim agrees with her, she will carve the victim’s mouth to create the same disfigured smile. Instead, if the victim answers negatively, the Slit-mouthed Woman will simply slice the victim’s throat. Possible ways to escape from this terrible fate include giving a more generic and neutral answer. The Slit-mouthed Woman can also be driven away by showing her a distraction, such as throwing candies or money on the ground.

The Slit-mouthed Woman appears as the first case in the horror-adventure World of Horror. The game has an interesting 1-bit art-style and features deadly mysteries to solve and disturbing creatures to defeat (you can have a glimpse of the bestiary here: The most disturbing eldritch creatures from the bestiary of World of Horror). World of Horror takes huge inspiration from Japanese folklore and horror mangaka such as Junji Ito or Kazuo Umezu. It then comes without surprise that creatures from Japanese urban legends are also widely present in this game. In fact, the Slit-mouthed Woman is the first boss encountered during the tutorial. The mystery is set inside a school where brutal murders are happening, caused by a woman wielding a pair of scissors. The Scissor Woman here is more of an eldritch curse, a being materializing from dense smoke to massacre people, to then disappear to curse another place. To stop the Slit-mouthed Woman, it is necessary to find the correct elements of a ritual and to draw the perfect glyphs on the blackboard. By doing this, the player can face a normal version of the Slit-mouthed Woman, a very simple battle in a usually complex game. The Scissor Woman will take shape from black smoke as a tall woman wearing a raincoat and wielding a pair of scissors. The creepy detail? Her head is composed of three different heads, lined up vertically and connected by a continuous twisted and grin smile. However, the interesting detail is that this is only one of the four different versions of this boss.

For example, if the player fails to perform the ritual, a more eldritch version of the Slit-mouthed Woman will manifest. And this will be a tougher battle. The Horror Slit-mouthed Woman is a far more difficult enemy, the true eldritch essence of this monster not weakened by the ritual, with more attack power and HPs. Her face is more twisted and evil, even far less human, with void eyes or even multiple eyeballs in her faces. Defeating this strengthened version will award a special weapon, her Cursed Scissors, the second most powerful weapon in the game but with the downside of having a small probability with every attack of fastening the coming of eldritch gods. Defeating the Horror Scissor Woman also unlocks the Ending B. Both versions of the Scissor Woman can also permanently disfigure the main character by carving her characteristic creepy smile on their face.

The third version of the Scissor Woman is very peculiar to face because it is completely related to another case. This mystery is a long investigation involving mermaids, creatures from the depths, and the mad school janitor. During the final face-off with the janitor, one of the options to survive without fighting the boss is to burn down the school. Yes, a very drastic option that will damage the main character but also opens a new possibility. In fact, if you then have available the Scissor Woman’s case and you play it after burning down the school, the game will remember this event. While exploring the ruins of the school, you will face the Burned Scissor Woman, a modified version of the Horror one with fewer HPs but even higher damage. Her design is similar to the Horror one, but in this case, her skin looks almost melted.

The last version of the Scissor Woman can only be challenged when selecting Timeline B upon creating a custom scenario. Timeline B is a more difficult playthrough, and it will often open to new boss battles in previous cases. Regarding the Scissor Woman, by playing Timeline B you can face the Ghost Scissor Woman. This is by far the most challenging and eldritch design. Losing any human appearance, the Scissor Woman is now only a towering pile of heads, twisted and grotesque, spiraling around in a mix of grin smiles and eyes opening inside the hairs. Every face will be maddening whispering “Am I beautiful?” with different tonalities. This time, the Scissor Woman is not a tangible being but a Spirit. In this case, a proper battle is impossible, and the player should find the correct combination of Bows and Claps to complete the ritual and exorcize the Ghost Scissor Woman. Failing the ritual unlocks Ending D, which implies that the ethereal form of the Scissor Woman can possess and control other people, marked by the creepy smile.

From a child-devouring demon to an Egyptian deity: The main Bosses at the end of each journey of Frail Hearts Versicorae Domlion and their symbolism [Boss Battle]

Gris is a sorrowful city of mysteries and broken lives. In this city, four people struggle against their lives and past, paralyzed by fear and regret. Meanwhile, a magician studies their journey as a part of a cryptic theater play, while collecting tarots when they face the manifestations of their traumas. This is only the beginning of Frail Hearts, a hybrid JRPG, and adventure with a great setting.

In Frail Hearts Versicorae Domlion, the player independently plays each storyline, deciding which character will reach the end of their road. While playing the story of a specific character, they will not be available during the flights, but you will use instead all the other characters. The battles are challenging and turn-based, with puzzle-like elements. In fact, understanding the correct strategy is the key to win each battle. Moreover, the characters can level up by using the Lust collected from previous battles, useful to improve skills or characteristics. However, Frail Hearts is a linear experience inside each chapter, where every battle is a boss battle (for a total of 22 enemies).

The art-style is full of personality and details, and this is especially true for the monsters. The abominations are a festival of details, going from demons to ancient Egypt-inspired creatures, reaching being so complex that is challenging to understand what they are. The main characters will face huge and tough abominations, especially at the end of their journey, where the boss will take shape from their fears and sorrows. Every monster is also associated with a cryptic tarot deck, which provides information on their symbolism.

In the following article, you can check the four bosses at the end of each journey, including their analysis and symbolism. The description of the tarot card obtained after defeating each boss is reported in italics at the beginning of each description.

Memento Mori

Finally, the silent blade descends on the World in ruins. Nobody can be saved… goodbye. Nobody can save me… farewell. Nobody saved me…

Death pure and simple. Memento Mori is a terrifying being made of different bodies merged together, with a dragon-like appearance. The body is clearly separated in half, with a side completely skeletal and dead, a symbol of its connection with death like a proper god of the underworld. The boss also shows other peculiar features, for example, the centipede-like neck, a creature often associated with evil and death in Japanese folklore. However, the most disturbing detail is the living half of the face, which is in fact the one of a dog. The family dog of the protagonist.

The creature can attack both with the piercing tail and the main body, inflicting a huge amount of damage. But the highest threat of this boss is its Mephitic Breath, able to debilitate even the entire party with poisonous effects. The battle against Memento Mori is a huge skill check and a race against time. Will you kill it fast enough before the poison will do the same to the party?

Memento Mori is the final boss of Anne’s route. The girl is a skilled student from the local university, with a brilliant mind focused on science. However, Anne doesn’t have much outside of her studies, only her family and dog. But this is not enough for her, and quickly, her life becomes an oppressive trap. Too much care morphs into a prison, and Anne is trapped in there. Memento Mori in Latin is to “remember that you will die,” a constant paranoia of dying without achieving anything. And Anne’s paranoia takes the shape of her twisted dog and family, since the creature appears after her doppelganger family spoke to her. The boss is extremely disturbing, especially the way it asks Anne to bring it out for a walk, as if the monster still is her dog.

Lailah

Alone, from their first wailing, those babies do cry the loss of their mother. The hour of eternal sleep comes, forever extinguishing the light in the eyes of the innocent.

Lailah is probably the most challenging boss before the endgame. The flying demon has female features, with a pair of giant wings… and missing her lower half. Similar to the Philippine female demon also missing her lower half, the Manananngal, the boss is also keen to devour infants. Lailah is bold, and her face shows a sort of peaceful smile. The creature has a baby in her arms, an infant, held by the hands of this grotesque mother and connected to her body through a purple umbilical cord. However, in the middle of the battle, Lailah devours the baby, changing her appearance into a more feral form. Her peaceful smile will morph into a grin, while horns and an evil halo will appear on her head.

Lailah is a dangerous enemy, which can constantly fascinate the characters and send them to sleep, possibly doing some combos and unfair killings. She will wake up the sleepers with deadly Nightmares, inflicting heavy damage to the entire party. Especially after devouring the baby, Lailah can constantly fascinate the entire party, transforming every ally into a dangerous new threat.

Lailah is the final boss of Catherine’s route, a nun who will discover the horrible secrets hidden beneath her church. A grotesque secret made of carnivorous demons and children offered in sacrifice. Catherine’s journey will test her faith, and Lailah is the final trial between her faith and her new self-assuredness. Because Lailah represents a sort of reverted version of Holy Mary, a demon cuddling an infant. The connection is even more evident because, to access Lailah’s lair, the player must use a statue of Baby Jesus on Holy Mary to unlock the secret door.

Ben-Nut-Shu

Three are the personalities of one god, long lost in the eternal emptiness of an ephemeral existence. Which is their real face? Is it really that of a vengeful spirit?

The appearance of this boss is truly fascinating. Borne as a sort of forgotten Egyptian god, the figure is composed of three main targets. And at least two separate entities. The main body is a gigantic old man, a hooded god wearing pharaoh-like paraments and sigils, a terrifying monstrosity radiating power. The god has two giant arms, with incredibly narrow and long fingers, with the skin covered in ancient glyphs and chained at their wrists. The god is imprisoned in this dungeon lurking for freedom. The last entity is more simple but not less effective: a bird trying to fly toward freedom.

This boss is an easy battle, once you figure out how to defeat it. It is more a puzzle than a proper fight, but a very satisfying and well-implemented one. While the long arms will strike the party with attacks, the main body will only attack the bird, trying to sacrifice it. On the other hand, the bird will help the party by healing them. However, if you use multiple-targets attacks or directly target the bird, you will lose. So what is happening in this fight? Because the main body cannot be damaged, and destroying the arms is not enough to win. Only in this fight, each character has the Offering ability, which can slightly heal. Only by using Offering on the bird for long enough, the bird will run free. Subsequently, the main body will suicide.

This boss is the final enemy on Arthur’s route, an archaeologist who was adopted and mysteriously lost his father. While the Egyptian inspiration of the boss highlights the main profession of Arthur and his father, always wandering in tombs and ancient temples, the trinity of personalities of the god represents their family. The bird is an emblem of freedom, dreams, and hope, but also an unhealthy obsession for work or family, something that is necessary to let go to be free.

Gabriel

Farewell. Farewell to you, who I loved but didn’t know how to love. Farewell, heaven. Farewell, stars. Farewell, Fiore.

Gabriel is a tragic boss and a very tough opponent. The main body is a weak and harmless heart, which can be destroyed with a couple of attacks. However, the heart will soon shield behind a gigantic humanoid crow, a very aggressive and disturbing being. A human face, sleepy or sorrowful, is buried into the neck of the creature, swallowed by the black feathers. The creature resembles a distorted angel, not only because of the majestic wings but also for the huge halo on his head.

The battle is more challenging than could appear, and a lot depends on luck and raw attack power. The heart will immediately shield by creating multiple targets: the crow’s main body and its pair of wings. All the targets hit quite hard and can easily kill a party member in a single turn. Luckily, they have very few HPs, so it will be easy to expose the heart. The main problem? At every heart’s turn, the crow will generate again, bringing the exact same problems as the battle before. So, even if the heart is very weak, if you finish the crow with very few or no turns before the heart, the challenging battle will start again.

Gabriel is a tragic boss borne by an unspoken love story. He is the final boss of Michael’s route, a gangster with feelings for his best friend. However, both of them never spoke about their feelings… till it was too late. The heart shielding behind a ferocious beast is a clear symbolism of these hidden feelings, of burying the love under a mountain of appearance and toxic masculinity. So to truly reach the heart, it is necessary to defeat the monsters hiding and protecting that fragile and intimate feeling.

If you want to check the complete battles against these bosses, the following video in the Surreal and Creepy YouTube channel will satisfy your curiosity:

Challenging the Old Gods of Fear & Hunger and Termina [Boss Battle]

Fear & Hunger doesn’t go soft in terms of enemies and bosses, providing a set of disturbing and grotesque creatures, including challenging boss battles against gigantic abominations able to wipe out the entire party in a festival of mutilations. In fact, this is the second entry for Fear & Hunger in Boss Battle, previously featuring the relentless Crow Mauler: When it is impossible to Save: surviving all the mutilations of the Crow Mauler in Fear & Hunger [Boss Battle].

Fear & Hunger has a complex Pantheon of gods, specifically divided into Old and New. While the New Gods are humans ascended to divinity, the Old Ones are ancient twisted and macabre beings, mysterious creatures born at the beginning of time. Usually, the Old Gods are described and portrayed in books scattered around the dark dungeons, manuscripts probably wrote by cultists trying to assign a physical form to their deities, even if this is often far from the God’s true form. At least 5 Old Gods are described in the books, starting with Alllmer, a sort of twisted revisited version of Jesus Christ, to the hermetic Moon God, which has a relevant role in the sequel of Fear & Hunger. However, two Old Gods appear as hidden boss battles in the original game, offering brutal and challenging fights.

Gro-goroth is also known as the God of Destruction, a dangerous and malevolent entity connected with death and carnages. The Old God lies beneath the most difficult dungeon of the game, deep inside the mouth of a gigantic monster, after passing deadly traps and monsters. Moreover, Gro-goroth can be faced only by going for the Ending B, meaning that a party member, the Girl, should be dead (if you want an idea of all the horrible things that can happen to this party member, check my article: Fear & Hunger: the many ways to permanently sacrifice the Girl [Evil Quests]). Gro-goroth will emerge from the darkness below a platform entirely made of dead bodies, ready to fight the party after an existentialist conversation. Only the upper half of the gigantic creature is visible, a muscled torso made of twisted flesh, grotesque organs, wings, and gigantic stone-like claws. Gro-goroth is a visual cacophony of flesh, even having a mouth opening in the middle of its chest, or sort of beak-like elements decorating its neck. The face somehow keeps a sparkle of humanity, a pale mask similar to a marble statue.

As expected from an end-game boss fight, the enemy is a devastating force of destruction. The gigantic god has multiple attacks, caused by different limbs and organs. The sharp claws are its main weapon, able to inflict tremendous damage, including the bleeding effect. Taking this into account, cutting-off the claws is a vital strategy to facilitate the fight. But this is not all, multiple eyes can emerge from the flesh of its body, creating additional enemies. The eyes will cry out a scorching liquid on top of the party, causing moderate damage and the burning effect. Up to 5 eyes can open in its body and, even if they have few HP, not taking action against them could cause a swarming of damages and effects in each turn.

If this is not enough, Gro-goroth also knows powerful spells, such as Burning Gaze or the mysterious Whisper of Gro-goroth. The second enchantment is particularly peculiar: it will mark a party member with a countdown and, when it will reach 0, that character will instantly die. After all, Gro-goroth is the god of death and destruction for a reason.

If you want to look at the complete challenging battle against Gro-goroth, you can check the video in the Surreal and Creepy YouTube channel:

The second Old God was added to the game in one of the last updates. While going for ending C, the player will now reach an empty and dark wasteland, a sort of abyss out of time and space. In this extreme environment, the main character should find again the other party members while avoiding deadly and dangerous hunting creatures. But it is on a stone bridge suspended above a green light that the party will face Sylvian, the god of sex and fertility. If Gro-goroth was very similar to the images inside the unholy manuscripts, Sylvian is drastically different. The books portray her as a humanoid goddess with the body covered in breasts, a fitting representation for the god of fertility.

Sylvian is honoured with orgies from her followers, worshipped as carnal and universal love. However, Sylvian’s love for mankind got twisted during the ages, becoming a sick parody of sex, passion, and love. For example, people marrying in honour of Sylvian will be blessed with an abominable marriage, meaning that their bodies will be fused together in a grotesque mass of flesh. This is also reflected in the true form of Sylvian: a grotesque mass of green flesh and tentacles surrounding a half-exposed ribcage, with pointed breasts and a shark-like head.

The boss battle is probably the most difficult in the entire game. The god has an insane amount of HP and it can use some really dirty tricks. Each tentacle attacks individually causing different negative effects, such as stun or bleeding, but the bigger ones are the true danger, especially if they grab party members, basically trapping them in a suffocating hug. Sylvian can also strike the mind of the characters, complicating the life of spell-casters. Color of the Unknown is the most dangerous between these attacks since it will damage the minds of the entire party.

However, the most disturbing move is related to a sort of tumorigenic mass that will grow at each turn from the ribcage of the god. The attack is very similar to the one of another creature, Uterus (you can read about this monster here: Monster of the Week: Uterus (Fear & Hunger)), just this time it is even more dangerous. If not defeated on time, the mass will transform each turn into a more humanoid figure. The fully developed creature will add an extra layer of difficulty in the battle, with the possibility of completely murdering a character with one attack.

While other Old Gods are present in the game, such as the dead body of Alllmer, only Gro-goroth and Sylvian can be challenged and defeated in battle.

However, as expected from images and Demo, the Moon God, Rher, plays a central role in the sequel Fear & Hunger 2 Termina. The Moon God is very mysterious, hidden in plain sight from humanity and with ambiguous plans. It is also addressed as the Trickster God, described as jealous and incredibly resentful of humanity. On the other hand, in contraposition, Rher is also considered the God of Truth. In fact, people exposed to its “moonlight” mutate into their true selves… of course meaning mutating into grotesque and insane abominations. While common people go into a shared mutating path while “moonscorched,” as if this is a sort of supernatural disease, special people evolve into more dangerous and personalized monstrosities, often keeping a sparkle of their intellect.

Several creatures and characters from the previous title, specifically the disturbing Pocketcat and the Lady of the Moon (which you can read more about here: The Pocketcat of Fear & Hunger: what RPG merchant could be more disturbing than one exchanging items for children? [Evil Characters]) are servants of this mysterious Old God. They are obsessed with children, especially to kidnap them, probably not only to despise humankind but also to remove gifted people from the equation. In Termina, Per’kele is the emissary of Rher, in charge of organizing the Termina festival to select the surviving candidate and admit them to his tower.

As for the two previous Gods before, it is also possible to fight Rher in Termina. To face the God, the player should look for ending B, meaning to become the only candidate reaching the tower alive but still not considered worthy of the Rher’s attention. After defeating Per’kele, he will reveal that the god left this reality, leaving only a trace behind it. And still, as if pulled from a chain, a gigantic smiling moon will drop from the sky to crush the unworthy player. And this is where the battle against Rher begins.

Rher appears as a creepy gigantic face with holes as eyes and a skeleton-like mouth, surrounded by two rings full of eyes. The God is an insanely difficult battle, especially since the player must kill all the other potential party members to face it. So basically you can only fight it alone, or maximum with an evil goat, weak ghouls, and summons. And if this was not enough, Rher has a tremendous range of attacks. Its base attack, Moonscorched, is a column of light falling from the sky, a single-target high-damage attack. Two hits from this attack are enough to kill any character. Lunar Storm materializes a meteor shower from the sky, heavily damaging the entire party. Dreamscape is probably the most visually striking attack. Rher will briefly summon a warrior made of light, which will slash one target. The attack is not as damaging as Moomscorched, but this is not a relief since Dreamscape has a high chance of severing limbs.

However, the most complex side of the battle comes from the eyes surrounding Rher. The eyes attack after Rher using multiple times the All Seeing Eyes ability. In the beginning, these attacks look like a minor concern, only slightly damaging the Mind. But there is a powerful downside to this. When Mind reaches 0 against Rher, each turn there is a 50% chance of simply dying because your Mind cannot manage Rher’s vision. First, you will become blind. Then, you will only see indescribable horrors. In the end, the brain will simply melt.

So while avoiding powerful attacks, without a party, the player must also kill as many eyes as possible while managing their health and Mind to avoid instant death. This is what you call a secret super boss battle against an Old God.

If you want to see the complete battle against Rher, with a powerful set up, have a look at the following video on the Surreal and Creepy channel [Rher’s battle at 8:38]:

A JRPG boss that looks like escaped from Silent Hill: surviving the 4 stages of Dominus Circus from Scarlet Nexus [Boss Battle]

Scarlet Nexus has quite simple mechanics for a JRPG, but what it lacks in gameplay is amply balanced in terms of lore and enemy design. Because the antagonists of Scarlet Nexus, called The Others, could easily join the roster of creatures of a never-released Silent Hill game.

Every creature is a chaotic mix of random items, such as vases, and human parts, especially female legs. The elements are combined together in the most grotesque and surreal way, creating figure that could be part of a Dalí or De Chirico’s painting. In fact, the creatures are created by the modern Japanese artist Masakazu Yamashiro to convey the most alien-looking aesthetic.

While many Others show truly interesting concepts, the most disturbing and brilliant design is always Dominus Circus. One of the last bosses of the main story, the creature will suddenly appear in a giant labyrinth inside the mind of the main antagonist. The monster never appeared before, and only a brief cutscene before the battle provides a barebone background of its past. The only provided information is that Dominus Circus is a immortal Other that was never defeated, a boogeymen for all the soldiers in Scarlet Nexus’ world. And soon after this cutscene, the player should be ready to face the terrifying creature.

The introduction of Dominus Circus is a disturbing surprise. In the beginning, the boss appears only as a sort of classic ghost, a humanoid figure covered under a white shroud. Then, after starting to rotate, the creature will reveal multiple human legs on a monocycle. But only after reversing upside-down, the real monster is revealed: a complex humanoid architecture kept together by thin horse legs. According to Masakazu, Dominus Circus is the climax of the Others’ anatomy, a creature so alien and bizarre to represent the ultimate Other. And from this apex symbolism comes the name “Dominus,” a being almost looking like a disturbing pagan god. The “Circus” part of the name is even more evident, since many details of the design are inspired by the circus, from the umbrella remembering a tent, to the monocycle of the upside-down creatures and the elephant head.

To have a glimpse of the complex and disturbing design of Dominus Circus, you can have a look at the creepy intro in the video below.

The battle against Dominus Circus is one of the hardest of the entire game, especially because it will challenge your memory in 4 long stages. In fact, each phase needs a different approach, and the specific use of supporting characters. This is because, in Scarlet Nexus, connecting with secondary characters unlocks special abilities, including hyper velocity to slow time, telekinesis, or teleportation. The correct use of different powers is necessary to overcome the main obstacle of each stage of this long and complex battle.

During the first stage, Dominus Circus wields a big umbrella as main weapon. With this bizarre spear, the creature looks even more whacky. However, regardless of the appearance, this is probably the most challenging form. In fact, the umbrella will not only completely shield the boss from frontal damages, but will also erupt a water jet that inflicts heavy damages while also knocking the characters down. Moreover, the rotating lower body can also become a deadly drill that the boss uses to charge at the characters to inflict huge damages. And if this was not enough, Dominus Circus can also summon a gigantic water storm, so gorgeous to see as deadly to experience. Using quick skills to jump behind its back, bypassing the umbrella shield, is crucial to kill the first phase.

After each form is defeated, for a brief instant, the small ghost-like figure on the monocycle will appear, completely harmless. Then, it will fall on the ground, disappearing below, just in time for a new dangerous form to remerge.

For the second stage, Dominus Circus has no weapon, but instead it proudly wears a disturbing elephant head. As you can expect, this is the deadly weapon of the second stage. From the trunk, the boss can shoot different kinds of projectiles, including oil. Moreover, Dominus Circus can also summon a thick mist, which completely hides the creature. Using the clairvoyant skill is essential to counter this move and see through the mist. The second stage is very disturbing and intimidating, but luckily less challenging than the first one.

For the third stage, Dominus Circus will be again headless. However, this time, instead of an umbrella, the boss wields a disturbing sword, which looks like made of a combination between a seashell and multiple human arms twisted together. If the other forms are creepy, just looking at how this fleshy sword bounces in its hand is pure nightmare inducing. During this stage, Dominus Circus shows, as expected, dangerous melee combos, which can easily and quickly kill a character. More unexpectedly, the sword can also throw wind-waves, also working very well as a distance weapon. With a good timing while dodging and a balanced use of powers, this stage is not so difficult to overcome.

Now that the 3 main forms are defeated, it only misses the last stage, in which Dominus Circus will combine all the previous weapons and attacks. Yes, you read right, every move and ability will show off in the final stage. So the elephant head to shoot projectiles and create mist, the tricky umbrella to shield from frontal attacks, and the deadly sword, everything packed together in a complex battle that will test your memory and reaction times. Once the combined form is defeated, after a stylish execution, Dominus Circus will be finally and truly dead.

Scarlet Nexus shows since the beginning a set of very creepy and disturbing creatures, but is only with the long and complex battle against Dominus Circus that it clearly shows its climax.

When your vacuum cleaner becomes a gigantic menace: fighting against a giant vacuum cleaning robot in Yakuza Like a Dragon [Boss Battle]

Yakuza Like a Dragon (YLD) is a brilliant new entry in the Yakuza franchise that completely changed the gameplay from brawler to classic JRPG. And the result is a brilliant masterpiece, combining a dark and grim crime story, with out-of-mind humor and very likable characters. Moreover, on the gameplay side, YLD creates a complex and complete system, including many skills and jobs to interchange, dynamic turn-based battles, and even insane summons!

While the majority of enemies and bosses are thugs, weirdos, or crime lords, in some cases the game will go out of the ordinary with more complicated boss battles. For example, on a couple of occasions, the party will face industrial machinery, such as a wrecking ball, and even a tiger. But the game will always give its best in the nonsensical secondary quests that, sometimes, will also end up in insane boss battles. And this is exactly what happens with the battle against Sojimaru, a gigantic Roomba that went berserk and is trying to vacuum clean everything.

The insane quest that will bring to this crazy fight is called “Preparing to Suck.” In the beginning, you only need to provide funding for an eccentric scientist that created Soji, the best vacuum cleaning robot in Yokohama. After collecting the money, the scientist will show its progress: Sojimaru, a gigantic version of Soji aimed at cleaning the streets of Yokohama, while also providing coffee and massages to the people passing by. Then, of course, something will go wrong when the scientist will activate the hyper mode, sending Sojimaru insane. Before starting the actual battle against the gigantic robot, there will be space for nonsense comedy, where the robot will suck inside its body not only the scientist but also a kitten and an elderly woman! Just to don’t put pressure on your success.

The battle is a concentrate of pure madness in every detail, starting with the music. While the normal battles have a very standard soundtrack, the battle with Sojimaru plays boring and repetitive music, which sounds like the one that you can find in an elevator. But the explanation provided by the scientist is very straightforward: this is the music that Sojimaru plays when offering a massage, which now got stuck in a loop.

The proper battle against Sojimaru has multiple phases. In the beginning, the main body is impossible to damage, and the party should focus on the two more fragile extendable arms. The robotic arms will attack independently, each of them using a special move related to their function. For example, one arm will use a powerful fire-based attack, which consists in throwing a jet of incredibly hot coffee, like a sort of altered flamethrower. The other arm has installed the massage function, which now got altered in a deadly electric attack, like a sort of high-voltage taser. The friendly and serviceable robot transformed all its “to serve and pleasure humans” functions into deadly elemental weapons.

The main body of the gigantic cleaning robot is also able to independently attack, mainly by using a frontal extendable platform, which is also electricity-based, but definitively less dangerous than the arms. However, another attack is the highest danger while facing Sojimaru. The robot will create a sort of beam vortex, spinning and vacuuming the party members. The attack is visually very appealing, and also dangerous. In fact, this spinning attack can hit a character multiple times, and can even affect more than one character at a time. The deadly “Giant Slalom” can truly turn against the player the sort of the battle.

The long battle will move to the next phase after the arms are destroyed. The main hatch on the body will open, revealing a weak point in the military-grade defense of Sojimaru. By attacking this point, the player can finally damage the main body of Sojimaru. Moreover, the panel is also weak against electricity, which can be exploited to speed up the long battle. The enemy has a lot of health, and it is quite resistant to physical damage, so the battle will be a very long one. Luckily, without the arms, Sojimaru is less dangerous than before. It can still use the powerful rotating attack, but at least it will not attack multiple times in one turn.

However, the battle is still not won. After more than half of its health is depleted, Sojimaru will enter into another hyper mode, boosting its stats. This event is also accompanied by a comic scene, where the scientist will reveal that only a secret password can activate this hidden power mode… but since you beat Sojimaru too much, the mode got self-activated for the damages.

After finishing the quest, Sojimaru will be repaired and a “management” mode will be implemented to its key component. This means that the robot can now be recruited as an employee in the business management minigame of YLD. Yes, this is a strange game.

But the flights against giant vacuum cleaning robots are not over in YLD. In fact, there is a secret version of Sojimaru, called Seiso Shogun, hidden in a secondary dungeon in the sewers of Yokohama. According to the in-game Bestiary (called Sujidex, just to mock Pokemon), this Sojimaru version was stolen and modified by a hacker, creating practically a war machine. The fight is identical to the base Sojimaru, just much more difficult, especially now that the arms can inflict an insane amount of elemental damages.

You can have a look at the actual battle against Sojimaru on the Surreal and Creepy channel:

When it is impossible to Save: surviving all the mutilations of the Crow Mauler in Fear & Hunger [Boss Battle]

Saving anywhere is a luxury of modern game, but it was never really common in old-school JRPGs, for example. Having fixed save-points would of course make the game harder by planning good the gaming sessions, putting a lot of care in your strategy to survive till the next save, or else you would be cursed to repeat entire sections. Some games push this even further, almost to a masochistic level. Permadeath is surely the worst case, erasing your save files after dying. Other games will also try different strategies. For example, Fear & Hunger will try really hard to make your journey a nightmare.

The save point for the first half of the game is a bed hidden inside a cell. If at the beginning this will look like a lucky event, after saving for the first time, the situation will get worse. Each tentative of saving has 50% possibilities of triggering a deadly fight against a really tough boss: the Crow Mauler. The abomination has the head of a crow, with a really exalted expression, on top of a muscled human body. The left arm is fused with a spiked mace, which of course is used as his main weapon. Official lore of the game describe the Crow Mauler as something that “was set on purifying the dungeon from filth and deprivement”. This deadly creature will easily wreck an unprepared party, and it is one of the most difficult bosses of the game. But only by defeating the Crow Mauler, the player will be able to use the save point without any more worries.

fear_crow1

However, the fight is a real challenge, and surviving without casualties or deadly injuries is an almost impossible dream. Because the Crow has several nasty surprises to show to the player, so many ways to kill or mutilate the characters. The huge mace is for sure the main source of damage of the Crow Mauler. This scourge can inflict an insane amount of damages, and can easily kill a character with a couple of blows. Each attack has also a really high probability of breaking bones, a negative status effect which will permanently reduce the maximum HPs of a character. Without any possibility of healing it for the rest of the game. Also his arm-mace has an insane amount of HP, making practicality a waste of turn trying to cut it. But if you think that this is the most deadly attack, you are terribly wrong.

The Crow Mauler’s beak is not there as a simple animal vestige, but it is in fast his most dangerous weapon. The beak has a really high probability of hitting a character, resulting in… an instant death. With a single attack the Crow can one shot whichever character, by pecking away his head in a gory geyser of blood. Let’s also remember that as any mutilation, death in Fear & Hunger is permanent. So even if you can finally kill the Crow, there is a critically high probability of losing at least one character.

Sadly for the players, death and broken bones are not the only permanent statuses that the Crow Mauler can inflict. The creature can summon a flock of crows to strike the eyes of the main character. The damage is pretty ridiculous, but a mysterious symbol of an eye-patch will appear as status, while a threatening message will also describe how the flock of crows clawed your eyes. But, apparently, there are no consequences of this attack and the battle can continue as usual. Let’s imagine that, after a tough fight the player, manages to defeat the Crow. The moment after the battle, the screen will be completely black. The character can still move and examine, but in the absolute darkness. Could this be a bug? Of course no, the main character was blinded by the crows, and there is no way to revert this, since has any other mutilation in the game thus is also permanent. The only way to prevent this status is by wearing a complete helmet. There is absolutely no way of playing the game with this affliction, so the only way is to load a save to try again to fight the Crow Mauler. After a tough fight and an impossible win, the last sarcastic joke of the Crow Mauler is to let you believe that you won, while without eyes, this is just another burning defeat, even if the monster is dead.

fear1

Also if one Crow Mauler is not enough, the very late game has an unpleasant surprise. The last secret dungeon, and also the most difficult level of the game, hides several pits, which will throw the party in an organic basement. If falling in this viscid and damaging underworld was not enough as punishment, this place is also the hunting ground of a two-headed Crow Mauler. Even a well prepared party will find its hell in this fight, since double heads means also double beaks.

fear_crow_double

The Crow Mauler is a deadly adversary, and a sadistic trap for unprepared players. He will strike you when you least expect it, when you feel that finally you found a resting place where to Save. Every tentative against this monster is a breathless challenge, hoping to defeat it quickly, before having casualties or losing the eyes. The Crow Mauler embodies the atmosphere of Fear & Hunger, a dark, hopeless and unfair world.

Most dark, scary and creepy bosses from Castlevania saga

Castlevania is one of the most famous platform RPG, so famous that, together with Metroid, created the genre metroidvania. The gothic setting has some horror elements, especially in the design of the enemies or in some specific sections. Demons, skeletons and giant abominations are classic creatures, but mixed with a twisted Japanese design conferring to Castlevania a really interesting and wide set of enemies. The bosses are especially interesting, huge and terrible foes sometimes bigger than the screen itself. If some battle are against very regular creatures, some of the bosses are nightmarish beasts which could be proper enemies of a horror game.

In the following article you can find the most scary and creepy bosses of Castlevania saga, according to my taste. At the end it will be also a boss from the recent Bloodstained, spiritual sequel of the almost deceased Castlevania saga. Be ready to jump into nightmarish castles, where the vampires are the last of your problems.

  • Balore – Dawn of Sorrow

A hulking abomination with a green skin, wired teeth and a metal mask surrounding its head. The boss design is the classic “creature” from a gothic setting, probably the subject of an experiment, but with an overall disturbing design. The creepy monster uses the brute force against the main character, unleashing the fury of his giant fists.

balore.gif

  • Puppet master – Dawn of Sorrow

Maybe it doesn’t look from this image, but this is where the nightmares are born. A huge wooden puppet, mixing into the design a sort of skull together with a spider, hanging from the roof. The Puppetmaster’s eyes move in random directions, bulging out in a really disturbing way. It also has a giant mouth full of pointed teeth. The fight is also really horror-oriented, thanks to its disturbing attacks. It will often regurgitate from its mouth half-dozen of flying puppets, which will attack the player. But the creature has also another peculiar and deadly attack. It will create a puppet clone of the main character, and it will try to push it inside an iron maiden. If not destroyed on time, the player will exchange place with the puppet, receiving a huge damage from the iron maiden.

castlevania_puppetmaster

  • Menace Dawn of Sorrow

Final boss of the game, the creature is a really colossal zombie, one of the biggest bosses of the saga. The design is full of details, interesting colours and forms. Organic and inorganic merged together in a really scary giant. Human faces are morphing like organs in its body, for example in the mouth or in the knee. Also the skeletal face shows an extra set of jaws, just to highlight its feral behaviour. The boss will principally use its size to smash the player, but will also summon from his body creepy flying parasites.

menace.gif

  • Gergoth – Dawn of Sorrow

A sort of zombie dinosaur, and one of the most scary bosses of Castlevania. The skin is almost melted, probably because the undead body is rotting. There are wounds and bones opening everywhere, while the tale is missing a half. But the most terrifying element is only shown during its beam attack. The creature will pull off the skin from its face, revealing the muscle and the bones above it, before unleashing a deadly beam. The fight takes place in a very tiny space, and it is difficult to avoid all its attacks, especially a cloud of toxic gas.

castlevania_gergoth.gif

  • Eligor – Order of Ecclesia

A colossal centaur protected by a heavy armour, and full of weapons. The monster is like a gothic version of a tank or an aircraft, heavily protected and a fully equipped. The most creepy details is that the armour is covering something organic beneath, something probably made of twisted meat. The only apparent detail of the abomination lurking under the seal of the armour is a giant eye in the helmet. The design is simple, but effective to create the idea of “something wrong”. The boss is practically an entire level by itself, and the player can jump around while destroying the many weapons and avoiding blades and arrows.

ecclesia_eligor

  • Maneater – Order of Ecclesia

At a first glance, this creature is only a mass of skulls with their tongues out. However, the truth is far more grotesque and disturbing. The tongues are instead the body of huge parasites, which inhabits the giant skulls. The boss fight takes place inside a huge chapel entirely made of skulls and bones, just to add another creepy detail. The boss is sadly a quite standard fight, and will mainly attack by regurgitating bones through its mouths.

castlevania_maneater

  • Behemoth – Portrait of Ruin

The upper half body of a Minotaur, horribly cut in the middle. The organs are exposed, as part of the spinal chord. The creature will drag around in the floor, in an almost pity way, trying to charge at the player. There is something almost sad in the torments that this creature probably endured, but combined with its aggressive behaviour , it creates a really creepy boss.

castlevania_behemoth

  • Scylla – Symphony of the Night

A water monster with a very peculiar design, far from the Greek creature that inspired it. The monster is composed of a naked female figure, fused at her belly with 3 wolf heads, which then evolve into a mass of tentacle-like snakes. The design is not only innovative and bizarre, but also a bit disturbing in how so different animal motifs are combined together. The boss has many independent attacks, coming from the different parts, and she is also able to raise the level of the water, trying to drown the main character.

Scylla

  • Granfaloon – Symphony of the Night

A giant sphere composed entirely of dead bodies. Of course this abomination could only be the final boss of the underworld section of the Castle. The reality is that the amalgam of bodies is only a shell protecting the real creature, which is composed of tentacles, able to shoot energetic rays. The most creepy detail is that while the player is damaging and removing the shell, the dead bodies will fall on the ground to attack the player, like a rain of tormented souls.

granfa-legion

  • Beelzebub – Symphony of the Night

This is really where the nightmares were born. Beelzebub is a boss that will surely stick in the memories of any player, especially for the gross and disgusting design, more than for the batte itself. Basically he is a giant rotten corpse, hanging and dismembered by several hooks. The creature is huge and divided in many body parts, which should be destroyed to finally kill this grotesque demon. Even if the main boss is virtually harmless, many giant flies will protect their master by attacking the player. Nothing prepared the player, at the time, for the vision of this gory and grotesque abomination, which for sure can be considered the most disturbing boss of any Castlevania.

Beelzebub_Castlevania

  • Special Mention: Bael – Bloodstained

Bloodstained is not an official Castlevania, but it is the recent spiritual sequel made by the original creator of the saga, after Konami abandoned it. The true final boss really deserve an inclusion in this article. A ring composed by three heads connected together by long spiral necks. The first head is a zomb-ish devil, with a creepy expression on his face. The other heads are a hellish cat and a disgusting giant toad, both fused together to create this aberrant abomination. The demon lord can cast many magics, can create a lava pool, attack with a chainsaw-like tongue, and can also bite the main character.

blood_bael

The final boss of the obscure Dreamcast game D2: a battle against psychedelic effects and sensory deprivation [Boss Battle]

D2 is an obscure and really peculiar game released only in Japan and US. Sequel of the mysterious adventure D, developed by the eccentric Japanese developer Kenji Eno, D2 tried to combine survival horror and JRPG, creating one of the most bizarre game ever. The main combat used a first point perspective, like a modern FPS, with the freedom to move the weapon and actively target different body parts of the enemies, while the main character was standing still. The plot is really twisted, bizarre and complex, mixing together a deadly virus, mutants, clones, eldritch abominations and robots. The game was anyway really mature and disturbing, with some scenes censored in the western release. Here I will talk about the peculiar final boss battle, so there will be light SPOILERS regarding the plot of D2.

The final boss is a mysterious and ancient entity called the Shadow. The creature probably came to the Earth inside meteor, maybe the same that destroyed the dinosaurs. The Shadow wants to annihilate every form of life, acting as an opposite force to Mother Nature. To avoid more unnecessary spoilers, I will just say that the fight with the Shadow is not only the key point in D2 plot, but a very different battle.

The Shadow is an incoherent mass of purple flesh and eyes. The weird abomination is not really intimidating, but more bizarre. The eyes are constantly moving, watching in different directions. The creature has strange glyph and structures, like an angelic halo surrounding its body, highlighting its divine role of purifier of planet Earth. To add strangeness to the battle, the background during the fight is an amalgam of flashing colors, like if everyone is under LSD. This creates a more alien and uncomprehending atmosphere, since the player is now fighting a being out of the ordinary logic.

vlcsnap-2019-03-23-16h51m11s168

To be a battle against an ancient and twisted God, the fight with the Shadow is, at least at the beginning, really simple and anticlimactic. The boss can be damaged by shooting at any part of its body, but will receive more damage by shooting to the eyes. The creature is also motionless and will do nothing to avoid the bullets. After many fights with quick and unpredictable bosses, very difficult to track and damage, the final boss is just a motionless lump of flesh? The Shadow has only very few attacks, usually throwing a lighting bolt at the player. The animation during the attack is quiet bizarre, with the creature shaking and twisting its body, surrounded by lightnings, before shooting. The psychedelic background is also not helping to make the fight more comprehensible.

d2_final

The fight is easy and predictable. Surely interesting, at least for the trippy scenario, not quiet common as battlefield.  The fight will suddenly evolve when the Shadow will start to switch off the senses of the player, one by one. This will not affect the main character as a negative effect or negative buffs, very common in JRPG, but will directly affect the player. The first sense to be affected will be the sight. The screen will fade to complete black, except for bullets and health meter. This is quiet different from the common “Blind” status in many RPGs, which is usually associated with a higher chance to miss the attacks. In this case, it is the player that is completely blind and this will be reflected directly in the gameplay. The player can still use the hearing to understand if he is hitting the Shadow or not, but the fight will get more complicated. Here you can have an idea of how fighting a boss while blinded would look like.

2wtfik

After the sight, the Shadow will destroy your hearing. After that, not only the screen is completely black, but also without any sound to guide the bullets. You can’t see and hear nothing, something quiet disturbing since the Shadow will continue to strike you with electrical bolts. At least there is still a way to hurt it and fight back, while healing. After the hearing, the Shadow will take away your ability to move. Now things are even more challenging, because you have no way to fight it back. You are simply there, blind and deaf, without any way to harm the boss. Also the health points will drop down to 1. The only way to survive is by healing really quickly, while using the items to stay alive. Blind, deaf and paralyzed, there is no more way to fight it back.

A voice in your head will change the dark fate of the battle against the Shadow. A new item can be used from the inventory, revealing a Flower. The power of Nature will help to fight back the negative energies of the Shadow, regenerating all the senses. The player can now fight again at full power. With all the senses back, the last part of the fight  is easy and straightforward, as at the beginning.

The final boss of D2 is really weird and anticlimactic. An easy battle, static and boring at the beginning, but with an unexpected twist affecting directly the senses of the player. This is more a puzzle than a proper battle, but the confusion during the fight when the screen fades to black for the first time is still really unreachable, altering the concept of “negative effect” that is usually quiet static in JRPGs. The psychedelic background, full of lights and colours contribute to create a unique setting for a really bizarre and peculiar boss.